Showing posts with label sweet. Show all posts

Friday, 20 May 2011

Loquat cake


After a long long brake from posting, I have something experimental to post now. Since living in Portugal now and getting to know all the fruits of the land I have many culinary experiments ahead of me.
Loquats have just ripened here and I had tried few commercial ones last year in Dublin, so I wasn't completely blind folded about the flavor. However, I must say that the ones from grandmothers loquat tree are so much more sweeter, juicier and also smaller, but that doesn't bother me much.
Since I haven't seen or heard anyone talking about making a cake with it here, I proudly took the challenge. Such a delicious fruit, so it must make a good cake.
Few days ago I spotted Martha Stewarts Rhubarb Upside-Down Cake somewhere in the internet pages. My loquat cake was made after this recipe, replacing rhubarb with loquats. I used about 400g peeled and deseeded loquats. That was about 20 fruits. And as usual, I reduce the butter and sugar amounts little bit.

Spreading the cake batter on loquats


Crumb topping which becomes a bottom


Saturday, 26 June 2010

Rustic rhubarb tarts from scratch


Finally I was able to shake off that don't-feel-like-cooking-mood and bake something. Its a beautiful summer day and its the last time to make something with rhubarb before its out of the season.
Month a go or so this recipe caught my eye while reading beautiful smitten kitchen blog where you can find the recipe, just like I did.
So I started off making the rhubarb compote to fill in my tarts. I wont bother to repeat the whole thing here, as I blindly followed her recipe and instructions. Plus, I have to follow the World Cup with the one eye (excuses, excuses, excuses), so where do I take this time to type it all in here :P
They came out pretty good. I can't belive that I say this but I would put some more sugar in the dough and suggest to eat the warm thing with scoop of vanilla ice cream. I just didn't have any, but you should get some when attempting this recipe.


Saturday, 26 December 2009

Daring Bakers Gingerbread House for Christmas


Little Gingerbread House

The December 2009 Daring Bakers' challenge was brought to you by Anna of Very Small Anna and Y of Lemonpi. They chose to challenge Daring Bakers' everywhere to bake and assemble a gingerbread house from scratch. They chose recipes from Good Housekeeping and from The Great Scandinavian Baking Book as the challenge recipes.

I must admit that I was lucky enough to grow up with a mother who was making gingerbread cookies on every single Christmas and some of the years we got more wild and built the gingerbread house. I remember that one year there was an accident with the house though, there was a little elf standing in front of the house holding a candle in the hand and when we weren't looking he set the house on fire. Anyway, we forgave him and continued our Christmas dinner.

I went with the Scandinavian recipe for the dough, since it's more from my side of the town. Yes, I did experience the same problem as everyone else that the dough seemed too dry, but I decided to ignore it. Since it was going to sit in the fridge for overnight, I thought that hopefully its better the next day. I was right! Dough was joined together much better, however it was quite difficult to work the cold dough, I had to put all my strength into the game. I did my own templates and designed my house rather smallish, taking account the fact that its only two of us consuming it, if any. I cheated a little bit and instead of sugar syrup I used melted chocolate to glue the bricks together.


Building in process

Scandinavian Gingerbread from The Great Scandinavian Baking Book by Beatrice Ojakangas

226g butter, room temperature
220g brown sugar
2 tablespoons cinnamon
4 teaspoons ground ginger
3 teaspoons ground cloves
2 teaspoons baking soda
100 ml boiling water
875g all-purpose flour

1. In a large bowl, cream butter and sugar until blended. Add cinnamon, ginger and cloves. Mix the baking soda with the boiling water and add the dough along with the flour. Mix to make a stiff dough. If necessary add more water, a tablespoon at a time. Chill 2 hours or overnight.
2. Roll the dough on a floured surface, cut required shapes and transfer these to the baking sheet.
3. Preheat the oven to 190'C. Bake for 12 to 15 minutes until the cookie dough feels firm.
Leave cooling on flat surface to maintain the perfect shapes.

Tuesday, 27 October 2009

Cacamoons ( Macaroons )


The 2009 October Daring Bakers’ challenge was brought to us by Ami S. She chose macarons from Claudia Fleming’s The Last Course: The Desserts of Gramercy Tavern as the challenge recipe.

Ingredients

Confectioners’ (Icing) sugar: 2 ¼ cups (225 g, 8 oz.)
Almond flour: 2 cups (190 g, 6.7 oz.)
Granulated sugar: 2 tablespoons (25 g , .88 oz.)
Egg whites: 5 (Have at room temperature)

Directions:

1. Preheat the oven to 200°F (93°C). Combine the confectioners’ sugar and almond flour in a medium bowl. If grinding your own nuts, combine nuts and a cup of confectioners’ sugar in the bowl of a food processor and grind until nuts are very fine and powdery.
2. Beat the egg whites in the clean dry bowl of a stand mixer until they hold soft peaks. Slowly add the granulated sugar and beat until the mixture holds stiff peaks.
3. Sift a third of the almond flour mixture into the meringue and fold gently to combine. If you are planning on adding zest or other flavorings to the batter, now is the time. Sift in the remaining almond flour in two batches. Be gentle! Don’t overfold, but fully incorporate your ingredients.
4. Spoon the mixture into a pastry bag fitted with a plain half-inch tip (Ateco #806). You can also use a Ziploc bag with a corner cut off. It’s easiest to fill your bag if you stand it up in a tall glass and fold the top down before spooning in the batter.
5. Pipe one-inch-sized (2.5 cm) mounds of batter onto baking sheets lined with nonstick liners (or parchment paper).
6. Bake the macaroon for 5 minutes. Remove the pan from the oven and raise the temperature to 375°F (190°C). Once the oven is up to temperature, put the pans back in the oven and bake for an additional 7 to 8 minutes, or lightly colored.
7. Cool on a rack before filling.


Excited I was to see the recipe for October challenge, Macaroons! I started to bake it and colored the dough lovely baby pink. Piped the biscuits on a try and off to the oven they went for 5 minutes. Took them out to heat the oven to 190 C degrees and no feet grew for my biscuits. Disappointed I was indeed. I wonder if the dough was too thick, although I did use the exact measurements. Also, the biscuits started to gain some color on top but later I discovered that the inside was completely uncooked and moist. Being disappointed with a result and all I didnt bother with fancy filling, just melted some milk chocolate with little bit of cream.

Monday, 27 July 2009

Infamous Milan Cookies


After considering to renounce this months challenge, due to a very busy schedule, the portuguese little helper offered himself to bake it. As usual his initiave was rather... errr... compromised by all the external distractions offered by a day off. So in the end I was still very involved in the baking process.

I don't feel very possessive about the daring baking's chalenges, however I still feel responsible for their outcome and I just couldn't leave it to an overconfident and easily distracted Portuguese baker.

To make things easy we decided to bake only the milan cookies, since the timeframe was rather small. However it turns out that they dind't come out exactly like on the reference pictures. The dough was to liquidy and in the end it was quite complicated to give some thickness to the cookies. After the first attempt becoming a whole tray cookie, the following were kept to a minimum size in other to maintain their... individuallity??


Anyway, it was a challenge alright but in the end we made something similar to what was intended.

Here follow the intructions:

The July Daring Bakers' challenge was hosted by Nicole at Sweet Tooth. She chose Chocolate Covered Marshmallow Cookies and Milan Cookies from pastry chef Gale Gand of the Food Network.

Milan Cookies
Recipe courtesy Gale Gand, from Food Network website

Prep Time: 20 min
Inactive Prep Time: 0 min
Cook Time: 1 hr 0 min
Serves: about 3 dozen cookies

• 12 tablespoons (170grams/ 6 oz) unsalted butter, softened
• 2 1/2 cups (312.5 grams/ 11.02 oz) powdered sugar
• 7/8 cup egg whites (from about 6 eggs)
• 2 tablespoons vanilla extract
• 2 tablespoons lemon extract
• 1 1/2 cups (187.5grams/ 6.61 oz) all purpose flour
• Cookie filling, recipe follows

Cookie filling:
• 1/2 cup heavy cream
• 8 ounces semisweet chocolate, chopped
• 1 orange, zested

1. In a mixer with paddle attachment cream the butter and the sugar.
2. Add the egg whites gradually and then mix in the vanilla and lemon extracts.
3. Add the flour and mix until just well mixed.
4. With a small (1/4-inch) plain tip, pipe 1-inch sections of batter onto a parchment-lined sheet pan, spacing them 2 inches apart as they spread.
5. Bake in a preheated 350 degree oven for 10 minutes or until light golden brown around the edges. Let cool on the pan.
6. While waiting for the cookies to cool, in a small saucepan over medium flame, scald cream.
7. Pour hot cream over chocolate in a bowl, whisk to melt chocolate, add zest and blend well.
8. Set aside to cool (the mixture will thicken as it cools).
9. Spread a thin amount of the filling onto the flat side of a cookie while the filling is still soft and press the flat side of a second cookie on top.
10. Repeat with the remainder of the cookies.

The best picture from the best possible angle from the Milan Cookies.

Saturday, 27 June 2009

Bakewell Tart…er…pudding


Lemon curd bakewell tart


The June Daring Bakers' challenge was hosted by Jasmine of Confessions of a Cardamom Addict and Annemarie of Ambrosia and Nectar. They chose a Traditional (UK) Bakewell Tart... er... pudding that was inspired by a rich baking history dating back to the 1800's in England.

I left the jam out and decided put lemon curd into my tart. I'm glad that I did it, because the result came out quite satisfing. This time I was happy enough, because all the cake was eaten on the first day. I managed to give it away to friends and even Joao gave thums up to this cake, so this recipe is a keeper.

Sweet shortcrust pastry

225g (8oz) all purpose flour
30g (1oz) sugar
2.5ml (½ tsp) salt
110g (4oz) unsalted butter, cold (frozen is better)
2 (2) egg yolks
2.5ml (½ tsp) almond extract (optional)
15-30ml (1-2 Tbsp) cold water

Sift together flour, sugar and salt. Grate butter into the flour mixture, using the large hole-side of a box grater. Using your finger tips only, and working very quickly, rub the fat into the flour until the mixture resembles bread crumbs. Set aside.

Lightly beat the egg yolks with the almond extract (if using) and quickly mix into the flour mixture. Keep mixing while dribbling in the water, only adding enough to form a cohesive and slightly sticky dough.

Form the dough into a disc, wrap in cling and refrigerate for at least 30 minutes

Frangipane

125g unsalted butter, softened
125g icing sugar
3 eggs ½ tsp almond extract
125g ground almonds
30g all purpose flour

Cream butter and sugar together for about a minute or until the mixture is primrose in colour and very fluffy. Scrape down the side of the bowl and add the eggs, one at a time, beating well after each addition. The batter may appear to curdle. After all three are in, pour in the almond extract and mix for about another 30 seconds and scrape down the sides again. With the beaters on, spoon in the ground nuts and the flour. Mix well. The mixture will be soft, keep its slightly curdled look (mostly from the almonds) and retain its pallid yellow colour.

Lemon curd

2 lemons, rind and juice
2 egg yolks
55g butter
225g sugar

Grate rind of lemons and squeeze out juice. Put sugar, rind and juice, butter and beaten eggs into a large basin on top of a pan of simmering water. Stir with a wooden spoon until thick and curd coats the back of the spoon. Pour into warm sterile jars, cover, seal and label. Refrigerate.

Assembling the tart

Line the tart pan with the crust. Pour the lemon curd on the crust and spread it out evenly. Cover the curd layer with the Frangipane, spread evenly. Dont mind if it gets slightly mixed with the lemoncurd, it won't spoil the final result.

Wednesday, 27 May 2009

Apple Strudel


Rolling the strudel

Now this one was exciting for me. I love Apple strudel. I have thinking about it for a while already, so May's challenge was like Linda and Courtney reading my mind. The best strudel I ever had, goes all the way back to my childhood. She was a neighbour of ours and the strudel she made was divine. I remember my mother asking the recipe more than once, and we did it, and we did it, but it never came out the same. Maybe her oven had a little twist. I dont know.
The May Daring Bakers’ challenge was hosted by Linda of make life sweeter! and Courtney of Coco Cooks. They chose Apple Strudel from the recipe book Kaffeehaus: Exquisite Desserts from the Classic Cafés of Vienna, Budapest and Prague by Rick Rodgers.
This strudel was quite close to the my childhood one, but still missing something. I think I could have added more sugar. In my apple strudel I kept the apples, but left out raisins and replaced breadcrumbs, with ground almonds.

Monday, 27 April 2009

Abbey's Infamous Cheesecake

Raspberry cheesecake

The April 2009 challenge is hosted by Jenny from Jenny Bakes. She has chosen Abbey's Infamous Cheesecake as the challenge.

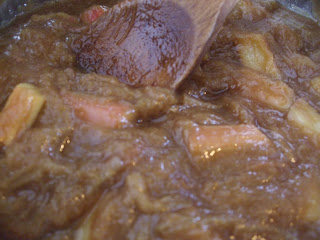
As suggested by the hosts, this months challenge was about getting really creative with your cheesecake. Once again I have gone down the simple path and chose a single flavour, raspberries, for my cheesecake. Its the same old story that Joao doest like complicated sweets, so I must keep it as simple as possible to appeal him. Result was almost perfect. Cheese part was lovely, tasty and tender, but the crust stayed bit mushy. Cheesecakes that I have eaten the crust is dry and crispy, but mine stayed soaked.
I failed to keep some raspberries for garnish, so my cheesecake looks a bit boring, but taste was far from being boring, don't judge simply by the looks.

Abbey's Infamous Cheesecake

crust:
180 g graham cracker crumbs
115 g butter, melted
2 tbsp.
1 tsp. vanilla extract

cheesecake:
670 g cream cheese, room temperature
210 g sugar
3 large eggs
1 cup heavy cream
1 tbsp. lemon juice
1 tbsp. vanilla extract (or the innards of a vanilla bean)
1 tbsp liqueur, optional, but choose what will work well with your cheesecake

DIRECTIONS:
1. Preheat oven to 350 degrees F (Gas Mark 4 = 180C = Moderate heat). Begin to boil a large pot of water for the water bath.

2. Mix together the crust ingredients and press into your preferred pan. You can press the crust just into the bottom, or up the sides of the pan too - baker's choice. Set crust aside.

3. Combine cream cheese and sugar in the bowl of a stand-mixer (or in a large bowl if using a hand-mixer) and cream together until smooth. Add eggs, one at a time, fully incorporating each before adding the next. Make sure to scrape down the bowl in between each egg. Add heavy cream, vanilla, lemon juice, and alcohol and blend until smooth and creamy.

4. Pour batter into prepared crust and tap the pan on the counter a few times to bring all air bubbles to the surface. Place pan into a larger pan and pour boiling water into the larger pan until halfway up the side of the cheesecake pan. If cheesecake pan is not airtight, cover bottom securely with foil before adding water.

5. Bake 45 to 55 minutes, until it is almost done - this can be hard to judge, but you're looking for the cake to hold together, but still have a lot of jiggle to it in the centre. You don't want it to be completely firm at this stage. Close the oven door, turn the heat off, and let rest in the cooling oven for one hour. This lets the cake finish cooking and cool down gently enough so that it won't crack on the top. After one hour, remove cheesecake from oven and lift carefully out of water bath. Let it finish cooling on the counter, and then cover and put in the fridge to chill. Once fully chilled, it is ready to serve.

Saturday, 28 February 2009

Flourless seduction

Beautiful bite ...


I am cooking this months challenge from my mothers house. I came to Estonia for a week. Its snowy here and pleasently cold, not too much. Just a perfect environment to pamper our tastebuds with divine chocolate flavour.


New chocolate cake recipes are always welcome. This was my first time to try the flourless version. The amount of chocolate that goes in is a bit scary in first glimpse, but in the taste it transformes into true pleasure.


The February 2009 challenge is hosted by Wendy of WMPE's blog and Dharm of Dad ~ Baker & Chef.We have chosen a Chocolate Valentino cake by Chef Wan; a Vanilla Ice Cream recipe from Dharm and a Vanilla Ice Cream recipe from Wendy as the challenge.


Cake was unbelievably easy to make. I did ditched the ice cream making part and served it with store bought vanilla ice cream. The photograph that I am using is without the ice-cream though, for a simple reason that I prefered it without ice-cream. Just with a dash of powdered sugar and lingonberries from my mothers freezer.

Chocolate Valentino

454 grams of semisweet chocolate, roughly chopped
146 grams total of unsalted butter
5 large eggs separated

1. Put chocolate and butter in a heatproof bowl and set over a pan of simmering water (the bottom of the bowl should not touch the water) and melt, stirring often.
2. While your chocolate butter mixture is cooling. Butter your pan and line with a parchment circle then butter the parchment.
3. Separate the egg yolks from the egg whites and put into two medium/large bowls.
4. Whip the egg whites in a medium/large grease free bowl until stiff peaks are formed (do not over-whip or the cake will be dry).
5. With the same beater beat the egg yolks together.
6. Add the egg yolks to the cooled chocolate.
7. Fold in 1/3 of the egg whites into the chocolate mixture and follow with remaining 2/3rds. Fold until no white remains without deflating the batter. {link of folding demonstration}
8. Pour batter into prepared pan, the batter should fill the pan 3/4 of the way full, and bake at 375F/190C
9. Bake for 25 minutes until an instant read thermometer reads 140F/60C. Note – If you do not have an instant read thermometer, the top of the cake will look similar to a brownie and a cake tester will appear wet.
10. Cool cake on a rack for 10 minutes then unmold.